
mailer box packaging design
Showing the single result
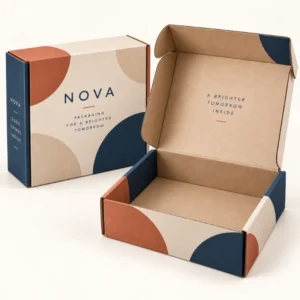
mailer box packaging design is the process of planning a mailer box as one piece of work: its size and board grade, its structure and inserts, and the artwork printed inside and out. Good design makes the box protect the product, pack quickly, print cleanly and give the customer a composed, recognisable moment when they open it.
Start mailer box packaging design with structure, not artwork
The most common design mistake is drawing artwork for a box that has not been sized. Structure comes first. Measure the product as it will sit in the box, including any bottle, jar or folded garment height, then add the space the insert and board need. A box that is even a little too shallow will bulge at the lid, spoil the print alignment and weaken the closure, however good the artwork looks on screen.
The formats on our custom mailer boxes UK page show the standard structures most designs start from, while custom mailer boxes with inserts shows how an insert changes the internal layout. Once the structure is fixed, the designer gets a flat template, called a dieline, which shows every panel, fold and flap at real size. All artwork decisions should be made on that dieline, not on a plain rectangle.
Artwork decisions that make mailer box packaging design work
Keep the outside simple and confident. A logo, a brand colour and one clear line of text read well at arm’s length, on a doorstep and in a customer photograph. Save detail for the inside, where the customer is close: the inside lid is the best panel for a thank you message, a short brand story, care guidance or a prompt to reorder or share the purchase.
Placing print so folds and flaps do not spoil it
Keep faces, logos and key text away from fold lines, dust flaps and the closure area, where board bends or overlaps. A pattern that runs across panels needs extra care at the folds, because a small shift in making up the box can misalign the join. Bold shapes, colour blocks and repeating patterns are forgiving; precise photographic joins across folds are not.
Designing for the camera as well as the customer
Many customers meet your box first in a photograph or a short video shared by another buyer. A strong visual idea in the centre of the lid, readable at a glance and complete within one frame, travels better than fine detail spread across every panel. Design the opened box as one picture, with the product, insert and lid message arranged to be read together.
Reuse what works. A design system that carries across our personalised mailer boxes and your outer printed postal boxes keeps recognition high even when box sizes differ, because the colours, type and layout language stay the same while the dieline changes.
Size, postage and testing before you commit
External dimensions decide the postage band, and they are fixed by design choices, not discovered afterwards. A few millimetres of extra depth can move a parcel out of a large letter band or into a higher parcel band, so design to the packed external size from the start and confirm it against the Royal Mail size and weight guidance for the services you use. Weight matters as well: heavier board and large inserts add up across a full order.
Always test a made up sample with the real product inside. Post the sample to yourself and open it as a customer would. That simple test reveals weak closures, moving products and misaligned print far better than any screen proof. Custom Postal Boxes offers free design support from our Wolverhampton team, free UK delivery and low minimum order quantities. Pricing depends on size, material and quantity, so share your product dimensions for a quote.
FAQs about mailer box packaging design
What is a dieline and why does it matter?
A dieline is the flat template of your box showing every panel, fold, flap and cut at real size. Artwork is placed on the dieline so logos land on the right panels and nothing important sits on a fold. Designing without one is the most common cause of misplaced print and lids that do not close cleanly.
Should I print inside the mailer box as well as outside?
Inside printing is usually worthwhile because the inside lid is the panel the customer studies while opening. It suits a thank you message, brand story, care notes or a reorder prompt. Keep the outside simpler and bolder, since it is seen briefly and at a distance during delivery.
How do I stop products moving inside a designed mailer?
Size the box closely to the product and use an insert matched to its base or shape. Movement causes most damage and also makes the opened box look untidy. A close fit with a simple cardboard insert protects better than a larger box filled with loose material.
Can one design work across several box sizes?
Yes, if it is built as a system rather than one fixed picture. Keep the logo position, colours, type style and inside lid layout consistent, and let the artwork scale or reposition panel by panel on each dieline. The boxes then look like a family even though their proportions differ.
Why does box depth matter so much for postage?
Postage bands are set by the packed external dimensions and weight. A small increase in depth can push a parcel into a larger band and raise the cost of every order, so the depth needed by the product and insert should be settled early and checked against current carrier limits.